
ATC Mini Book
This little book is 2.5 x 3.5 inches, the same size as an ATC)
Supplies
Scoreboard
Glue
Card stock for each Cover - 5.5 x 3.5 inches
Card stock (neutral colour) for Pages 10 x 3.5 inches (up to 3 strips)
Trims
Images: I have used Happy Harry; Jeanette Red Hat Gal; Franny da Kitty; Easter Girl. All of these can be found at Robyn's Digital Stamps and More Shop.
Scoreboard
Glue
Card stock for each Cover - 5.5 x 3.5 inches
Card stock (neutral colour) for Pages 10 x 3.5 inches (up to 3 strips)
Trims
Images: I have used Happy Harry; Jeanette Red Hat Gal; Franny da Kitty; Easter Girl. All of these can be found at Robyn's Digital Stamps and More Shop.

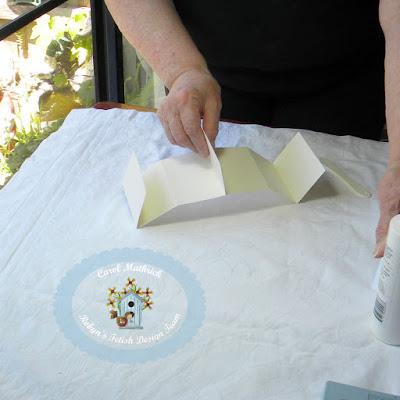
For the cover, score at the 2.5 and 3 inch mark.

Fold and crease along the score lines.

For the pages, score at 2.5; 5 and 7.5 inches, and then fold.

Depending on how many pages you wish to have in your little books,
you will need to join the pieces together. Place glue on one edge.

Join to another edge.
(Tip: instead of glue, you could place tape down the two sides and bottom, join them and you will have a little pocket)
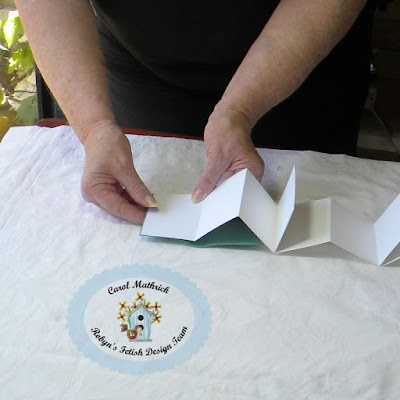
Starting from the front, 1 strip, middle is 2 strips and back is 3 strips.

Attach pages to cover by placing some glue around the edges of the inside of the cover.

Place end of strip on glue.
Fold up pages and turn book around. Repeat process by placing glue on the other inside of cover and glue down the other end of the pages.

I usually find 3 strips give a good deal of pages.
In the photo, the white pages are 3 strips, the cream 2 strips.
This is purely a personal thing, even 1 strip works.

Time to decorate.
When decorating with trims, do not forget the back of the cover.

Images and Trim make great covers. I do not use 3d squares on these books, but glue the images to the cover, to ensure they stay in place.


These little books are great for sticking in small bags, where you can't fit your diary. This means you still have something to jot down those phone numbers, names etc. when you are out and about.
Children love them for their size.
You could attach photos of grandchildren to the pages and give as a gift to a grandparent.
I hope you enjoy making these little books.
Carol

For the pages, score at 2.5; 5 and 7.5 inches, and then fold.

Depending on how many pages you wish to have in your little books,
you will need to join the pieces together. Place glue on one edge.

Join to another edge.
(Tip: instead of glue, you could place tape down the two sides and bottom, join them and you will have a little pocket)

Starting from the front, 1 strip, middle is 2 strips and back is 3 strips.

Attach pages to cover by placing some glue around the edges of the inside of the cover.

Place end of strip on glue.

Fold up pages and turn book around. Repeat process by placing glue on the other inside of cover and glue down the other end of the pages.

I usually find 3 strips give a good deal of pages.
In the photo, the white pages are 3 strips, the cream 2 strips.
This is purely a personal thing, even 1 strip works.

Time to decorate.
When decorating with trims, do not forget the back of the cover.

Images and Trim make great covers. I do not use 3d squares on these books, but glue the images to the cover, to ensure they stay in place.


These little books are great for sticking in small bags, where you can't fit your diary. This means you still have something to jot down those phone numbers, names etc. when you are out and about.
Children love them for their size.
You could attach photos of grandchildren to the pages and give as a gift to a grandparent.
I hope you enjoy making these little books.
Carol
Entered into:
5 comments:
hello! these are the cutest, thanks for the instructions! I am so glad you played along with us at simon says stamp Wednesday challenge!
blog-paperie blooms
ig-2klines
sparkle & shine, kindness *~*
What a clever idea! I'll be pinning this; great tutorial! Thanks for sharing with us over at TTCRD!
Katrina
ScrappyHorses.blogspot.com
Thanks for the tutorial, you make it look easy.
Great tutorial and adorable little books! Thanks for joining us at 4 Crafty Chicks this week.
Tina- 4CC DT
Cass, I love your mini book. It is terrific! Thanks for sharing. Edwina Brown
Post a Comment