
Hi! I'm a Tutorial Designer at Robyn's Fetish Challenge.
Today, I am going to show you how to make a Teepee Card.
Teepee Cards
Great for sending, but also great as decorations for special times.
Supplies Required:
A scorer (it is really helpful for these cards)
Card stock
Something to cut your card stock into the following squares
For each card you will need
3 squares at 5 and a half by 5 and a half inches
3 squares at 5 by 5 inches
3 squares at 4 and a half by 4 and half inches
Glue
Double sided tape
Coloured Images, I have used
Kitty Kitty Kat, Scarey Pumpkin, Willow da witch;,
Christmas
Scene 1, Merry Christmas Mouse, A Bell for Christmas, Mr Claus,
Putting up the Tree, Beautiful Bow, Beautiful Christmas Wreath,
My Little Cook, The Chef, Grannies Cookies, The Cook,
all from the Robyn's Fetish Digital Stamps and More Store
All have been coloured with Copic and Touch markers


Then cut one triangle from both of these into quarters (score first then cut your scored lines)

You will end up with a whole lot of triangles.

Images are on
Then use whatever embellishments you have.
I have used words on the Halloween Card

This one has just the images

Cass Creating Now Tutorial - Teepee Cards
Entered into:
CHNS Christmas All Year Round - Country
CHNS Christmas Extra - Anything Goes
Sparkles Christmas Challenge - Oh! Christmas Tree
Supplies

Cut your card stock into squares:
3 squares at 5.5 x 5.5 inches
3 squares at 5 by 5 inches
3 squares at 4.5 x 4.5 inches
(You could do bigger or smaller squares; just remember to go down in half inch sizes)

Score all the 5.5 x 5.5 inch squares in half diagonally.
Tip: Line up the bottom point with a scoring mark then line up the top.

Fold the 5.5 x 5.5 inch squares along the score line and put to the side

Take all the 5 x5 and 4.5 x 4.5 inch squares and cut diagonally.
I usually will score these lines before I cut them. It makes it easier
if you have an indication where to cut. 
Then cut one triangle from both of these into quarters (score first then cut your scored lines)

You will end up with a whole lot of triangles.

Each card will use 4 triangles from the 5.5 x 5.5 inch square
4 large triangles from the 5 x 5 square
2 small triangles from the 5 x 5 square (optional)
4 large triangles from the 4.5 x 4.5 square
2 small triangles from the 4.5 x 4.5 square.(optional)
You will have some triangles over.

Take the 5.5 x 5.5 inch squares and layer them as in the diagram. The dotted lines represent the scoring lines and you will be looking at the folds as valley folds.

This is a bit harder to see but here is the black card base I am working with at this stage

You can use either glue or double sided tape. The glue is easier to work with as you can move the pieces around to get a good alignment.
Mark where the glue line is to be, making sure you do not put any glue on the score lines.


You can use either glue or double sided tape. The glue is easier to work with as you can move the pieces around to get a good alignment.
Mark where the glue line is to be, making sure you do not put any glue on the score lines.

Then either use glue


Press the pieces together and when wrapped around they will form the teepee.
A paper clip holds the card in place.


or double sided tape.

Press the pieces together and when wrapped around they will form the teepee.
A paper clip holds the card in place.

Opened up, the card is ready for the decorating. Mountain folds up,
place your triangles in place, making sure everything fits. If they
don't just do some trimming.

Glue the triangles together, making sure the edges are even.

Then adhere to the card base


Glue the triangles together, making sure the edges are even.

Then adhere to the card base

Continue until the card base is completely covered.
On this one I reversed the tiny triangles.
YOU NEED TO PUT THE TRIANGLES ON WITH THE CARD FLAT.

Card erected.

Decorating
YOU NEED TO PUT ON THE IMAGES/DECORATIONS
WITH THE CARD ERECTED.
That way your images/decorations will be straight. In the picture below, the images look crooked but in fact they are straight when the card is erected. (see next picture.)

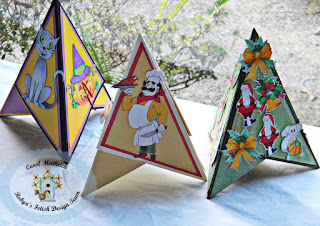
Images are on

Then use whatever embellishments you have.
I have used words on the Halloween Card

This one has just the images

This one has been turned into a Christmas Tree, with lots of images, glitter and little branches

Where I live we don't do very much for Halloween, although it is growing more popular, and we don't have Thanksgiving. For those of you who do celebrate these days, I am sure you to have lots of embellishments that would work with these cards or maybe use them as table decorations.
I hope you have enjoyed this tutorial and will give them a try.
Thanks for joining me today.
Happy Crafting!
Cass
Cass Creating Now Tutorial - Teepee Cards
Entered into:
CHNS Christmas All Year Round - Country
CHNS Christmas Extra - Anything Goes
Sparkles Christmas Challenge - Oh! Christmas Tree
7 comments:
Thanks for sharing your lovely crafting for CCAYR September challenge - hope to see you again soon, Hazel, CCAYR design team - and thanks for entering this for my CHNC challenge extra for September x
Hi Cass, Not sure if you saw my comment on the RF tutorial page or not. I love your teepee cards. You did a fabulous job on the tutorial. It is very clear and easy to understand. Thank you so much for sharing how to make them. Edwina Brown
Wow, this is an extenstive and detailed tutorial. Many thanks, I am sure I and many others will benefit from it. I love your final photo of the Christmas Trees for our challenge. Thanks for joining us at Sparkles Christmas. Caz DT
Your Christmas card is beautiful Cass. Thank you for playing along with our Challenge at Christmas Cards All Year Round. We would love to see you again … Anet DTx
Oh this is just the cutest card ever and just perfect for our challenge over at “ Sparkles Christmas Challenge " Oh Christmas Tree“ good luck and hope to see you again next time Dt Member Sandra H xx
Wow brilliant tutorial and gorgeous cards especially the Christmas ones, thank you for joining CHNC EXTRA challenge
hugs
lorraine x
A great card - thanks for joining us at Sparkles Christmas.
Helen x
Post a Comment