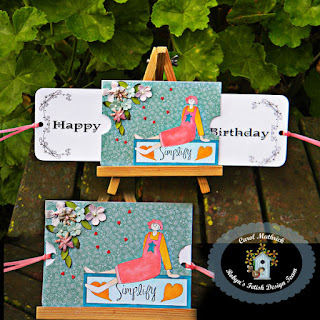
Today I have s tutorial for Robyn's Fetish Challenge.
Check out their tutorial page, you will find lots of great ideas.
There are lots of different ways to make these cards, this is one version.
Double Slider Card
Supplies
3 card blanks.
Double Sided Tape
Plastic shopping bag
Circle Punches
Decorations
The image I have used is called "Simplify" and can be found at
Additional Notes: You could cut and fold card stock, so long as you have 3 cards.
Double sided tape - You do not need the heavy duty red tape That is only used here for photographic purposes.
Card
1 - This is the front of the card. The design needs to be made in
landscape. It also needs to be made the wrong way around, so the bottom
of the image is actually against the fold of the card.
Card 1 - Using a round punch, punch a half circle through both layers of the card.
Card 2 - This card needs to be cut on one side only. I am using 5¾ x 4 inch card blanks. I have cut
½ inch from each side and down ½ inch on both edges (this is where the slider fits.)
Card
3 - This card become the 2 slider panels. You can print on them as I
have, or stamp/write the sentiment. Trim a small amount from the fold
side of the card, so that you end up with 2 panels that will fit inside
the card. Also trim some off the length so that it will only show
through on one side.
This
is how it works. Cut your paper bag to the width of the section cut
from card 2. Wrap around and using double sided tape, stick the plastic
to the plastic. Do not get any tape on the card.
Keep tape within the edge of the plastic - if you get any on the card, it will not work.
You need to place the panel up against the edge of the card (not the edge of the half circle)
mark where the edge is, place tape on the plastic and adhere the panel.
You
need to do this with both panels, but remember when adding the second
panel it needs to go face down. I have curled the Birthday panel up so
you can clearly see the Happy panel under the card but facing up.
Before you glue, check that both panels are facing the same way.
Construction
Take
Card 1 and place it on top of Card 2, so that the top edge of Card 1 is
against the fold of Card 2. See photo. Adhere at the card two fold
section. Use thin tape so you do not get any tape on either of the
panels or the plastic.
Flip
joined cards over. Place the slider mechanism on top of the front of
the card. You will know which is which by the half holes you punched
earlier. x marks the spot where these cards need to be adhered. Place
thin tape along the x where the fold is. Do not get any on the plastic
or panels and join the card. Card 1 becomes the front and inside cover
of your card, with the panels enclosed. Card Two is the back of the
card, both inside and out.
Lastly, take a small hole punch and punch a hole at the edge of both panels and thread
through some ribbon/twine etc.
I added some flowers, leaves and bows to complete the card.
The first one you make can be a bit tricky, but well worth it when you give this card to someone.
Happy Crafting!
Seize the Birthday - Anything Goes
Crafting from the Heart - Anything Goes


7 comments:
SO great card !! and so fun to look how you did this!!
Thank you so much for entering our ATG challenge at Through The Craft Room Door this week. Looking forward to see you again next challenge!
Hugs CicciTTCRD DT
ciccividpennan.blogspot.com {My Blog}
Through The Craft Room Door
ttcrd.blogspot.com
Gorgeous project. Thanks for sharing at Crafting from the Heart challenge
Great card Cass! I should try to make one of these; but it looks too complicated for me. LOL!
Thanks so much for joining our Lil Patch of Crafty Friends Challenge. We hope to see you again for the next challenge. Good luck in the challenge. Hugs, Gloria DT
http://purpleglocreations.blogspot.com
Beautiful card!!Thank you for joining us at Digi Choosday Challenges. Monica-Dt.
Such a cool fold technique Cass, thank so much for sharing!! So happy you have joined our Favorite Color Combo challenge at Digi Choosday! Hugs:)
Audrey
woow great card.. Thank you for joining our 21st challenge at Lil Patch of Crafty Friends Challenge blog.. Hope to see you again on our next challenges.. And good luck at the draw.. ;)
hugs,
~RoRa
What an awesome card! Anyone would be thrilled to receive this! Thanks for joining us this week at Seize The Birthday :)
Post a Comment